Tag Archives: Spray Foam

Is Spray Foam an Air Barrier?


If you’re retrofitting vintage buildings without an air barrier and you’re counting on the spray foam as your air barrier; don’t. If you do, test your work BEFORE you cover it with drywall so you can seal the air leaks first, then drywall.

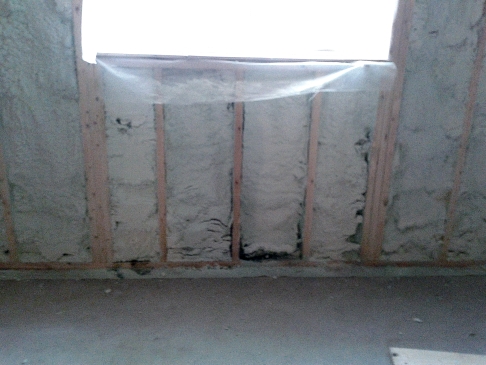
We had the pleasure of meeting a forward thinking design/build firm, Argyris & Clinkard Fine Homes. Their objective was to build thier client the most efficient home practical. Being a Deep Energy Retrofit an HRV was installed so the goal was to make the house as air tight as possible. 2LBS spray foam was sprayed in the stud “strapping” cavity and the studs were even spaced off the wall to reduce thermal bridging and ensure a monolithic uninterrupted coat of foam on the brick. Paul Clinkard and Liam Argyris  called us in to test the sprayed foam before the drywall went up. The results were an eye opener on why we can’t rely on foam alone for a good air seal in solid masonry home retrofits unless tested.


Background on Ideal Substrate

Foam sticks really well to clean wood or masonry when it’s dry and not frozen. It doesn’t stick well to dirt, oil or water. For the person spraying foam, it helps if they understand these application facts but they also need to know where to apply the spray foam and how the location CONTINUOUSLY moves as it passes from the basement to the rim joist to the roof.

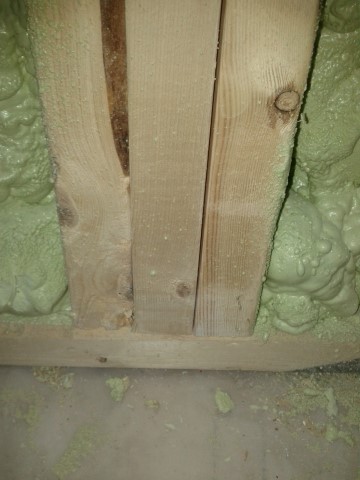
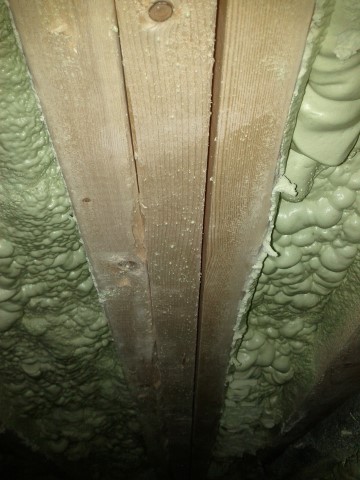
The ideal substrate to spray foam onto is scrupulously clean, openly accessible and free of wires, cross bracing, 6mil poly, plumbing, cables, ducts etc, you get the picture. Ideally there would be NOTHING in the stud cavities and the foam could be uniformly applied producing a good air seal. Is this realistic? Absolutely not, stud cavities are busy places and spraying in them for a perfect air seal is REALLY HARD to do.

This is because, spray foam is shot from a 3′ distance, and like a flashlight shooting light, all the stuff in the stud cavity creates unfoamed ‘shadows’ on the back substrate we want the spray to hit first. Those shadows create voids or open blisters that can leak air. With each pass of foam, the substrate’s surface transfers it’s increasingly more distorted shape to the next, new layer. The situation can be improved by training electricians to run wires on the back of the wall. Do keep the plumbing on the warm side of the foam, though it might increase the quality of the foam-seal, pipes will freeze.


The Trouble with Spray Foam

The trouble with spray foam is that it has to be sprayed onto a surface – ideally the air barrier – and often we can’t chose the surface as the situation forces our hand. For the sake of discussion, let’s imagine we wanted to treat the painted drywall as our air barrier as in the Air Tight Drywall Approach. If that were the case, to bond the spray foam to the air barrier we’d have to spray the drywall from the backside which would be ideal, but impossible because the exterior sheathing or in the case of a retrofit, the exterior wall already exists. So we foam inside the house and adhere the spray to the back of our new wall assembly hoping it’s airtight.

The part about bonding the foam to the air barrier is to eliminate air movement between the two. The gap behind the drywall and the new foam’s face becomes the highway that connects all the small leaks from the foam’s imperfections and unfoamed penetrations and when pressure is applied, voila! As they say, for leakage to happen, you need only a difference in pressure and a hole. Because we can’t stop the physics of nature from producing pressure differences, we can seal holes.

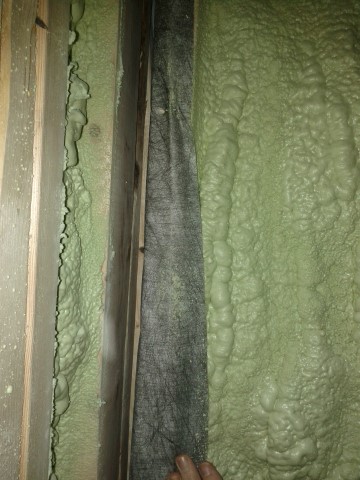
To be effective, the spray foam should be sprayed onto an exterior air barrier like wood sheathing or if a renovation of an old house, coat the inside faces of the exterior walls with an air barrier as in this NY retrofit. By the way, if this new liquid applied membrane is the air barrier, it still needs to be air-tightness tested before the spray foam is applied. The purported advantage of this liquid applied, fibrous membrane may lie in it’s increased flexibility and stronger adhesion for better long-term performance. For any Deep Energy Retrofit, the air barrier needs to be tested be it spray foam, poly, liquid applied membrane, plywood, insulated sheathing, Tyvek, Typar or painted drywall.

In the aforementioned house, the foam sprayed on the back of the 1950′s block & brick was the leaky, high R-value insulation and had the drywall been installed over the air leaks, it would have played the role as Air barrier system with or without 6mil poly, faults and all.


So What Happened at the House?

The house, when depresurised to 50 Pascals, leaked its entire heated volume over 10.8 times per hour (known as the Air Changes per Hour at 50Pa or simply, ACH50) with an Equivalent Leakage Area (ELA) of 340 square inches. This is a massive level of air leakage and completely unacceptable and for reference, a tested EnergySTAR home should leak no more than 2 times its heated volume at that same pressure. We sprang into action with the builder identifying air leaks in the foam, they had the bulk foamer come back to touch up the leaks. On retest the air leakage was cut in half to 5.4 ACH50 with an ELA of 177 square inches a significant drop in heat loss, discomfort and condensation liabilities.


Taking Subslab Insulation to 11

We dropped in on Manny and Anderson of Hardcore Renos to see how their first new build was progressing; very well thank you!

P1050096

Shervin laying all on the table helping to weigh the various energy upgrade options for the build. These guys are serious builders who want the best for their client and have invested in a planning process and have set targets for testing the home’s performance. In the end the homeowner wins.


We’ve known for years that heat escapes in all directions but its been difficult to convince builders and home owners to invest in sub-slab insulation. Of course, with the rise in popularity of radiant in-floor heating for the basement, insulating the slab is minimum code. We say it’s just common sense.

On this job site though, we saw something different, kinda like Nigel’s amp going to 11 in Spinal Tap. This house had sub-slab insulation WITH a THERMAL BREAK at the edge! I should have figured it was sprayed by Rich Krechowicz of CallRich Eco Services Inc his crew executed the job flawlessly.

P1050091

Photo 1: The beige colour above the basement slab is spray foam. If you look closely, you will notice the foam tapers from 2.5″ thick on the wall and feathered up to nothing.

A close-up detail of the previous photo shows the foam thickness between poured concrete wall and slab.

Photo 2: A close-up detail of the Photo 1 shows the foam thickness between poured concrete wall and slab.

I spoke to Mr. Krechowicz recently and he agrees “The concept of using spray foam is relatively unknown, so we don’t have these jobs too often.  The thermal break is so important and it is a detail that is mostly ignored or overlooked by contractors.” and I completely agree.

Figure_02

The drawing shows the continuous insulation under the slab and around edge to insulated wall. Source: Building Science Info-513: Slab Edge Insulation. Click above for link.

The loss at slab edge is significant and is more obvious in wintertime when snow accumulates along the foundation wall. Mr. Krechowicz says “At my house I have a non-thermal break in the part of the house that is slab on grade, and you can see the melting of snow along the perimeter.” The cobbler’s shoes…

Krechowicz goes on to say “Another benefit to using spray foam is that it makes the job of securing radiant floor tubing a breeze, as the staples can be attached directly to the foam.”

For a great article on the topic, check out the Journal of Light Construction’s Insulating a Slab With Spray Foam by Mike Pindle, Jan 2010.

In an earlier post, I blogged about the potential for spray foam to go off ratio which brings me to the last point about spray foam. The person pulling the trigger needs experience and has to have a solid understanding of building science in order to do their job properly.


When Spray Foam Goes Off Ratio

For high quality products, the manufacturing process needs to be understood and controlled very tightly. So too with spray foam when it’s manufactured on the job site. So when you order foam for your project, the crew that shows up should be sharp, organized and be well trained. When foam is manufactured and installed by a good team, the end result should be years of durable comfort.

The ‘A’ Foam Team

The guys you want on your job site are trained in a class room setting, with lots of building science in there for good measure and have a year’s experience with a professional spray applicator as mentor. They will know:

  1. their equipment inside out, treat their gear with respect and keep a clean truck,
  2. their foam well as each brand of foam has a slightly different recipe for making good foam,
  3. to test their installed foam for adhesion and density for each barrel set (CUFCA requirements),
  4. to connect and seal insulation planes – irrespective of insulation type – together.

The letter of the Law

Here are the two standards referenced by OBC for the manufacture and installation of spray foam:

“The … product meets the following standard:

•CAN/ULC-S705.1-01(including Amendments 1 and 2), “Standard for Thermal Insulation – Spray Applied Rigid Polyurethane Foam, Medium Density – Material – Specification.”

Spray-applied rigid polyurethane foam, medium density, shall be installed by a licensed installer in accordance with the manufacturer’s instructions and the following standard:

•CAN/ULC-S705.2-05, “Standard for Thermal Insulation – Spray Applied Rigid Polyurethane Foam, Medium Density – Application.”

For compliance to CAN/ULC-S705.2, users should contact the third-party organization [e.g. CUFCA] that has been identified by the foam manufacturer as the third party operating the field quality assurance program for the foam product.”


When things go off-ratio

In a nutshell, to manufacture good, durable foam, the two chemicals have to be married at the spray nozzle tip with precise temperature, flow and pressure requirements. This delicate balance just takes one spec of dust or lump of chemical to throw things off  and though it happens less frequently with good crews, it does happen to them too. The difference between good crews and irresponsible foam applicators is their response to the situation.

A good crew knows almost immediately when things are going wrong and they clean it up:

This section of 2LBS foam went off-ratio and the crew should have cleaned out and re-sprayed new foam.

This section of 2LBS foam went off-ratio and the crew should have cleaned out and re-sprayed new foam. There was uncured liquid resin at the bottom of the stud cavity and much of the foam had shrunken back.


And sometimes the the change in foam isn’t as blatantly obvious as in the case below. Allison Bailes III of Energy Vanguard has documented the same phenomenon in the USA. I met the builder who asked me i this was ‘normal’, frankly, I was stunned at what the builder discovered. There were as many as 15 examples of this puling away in the one basement. The builder found that where there were multiple studs ganged together, the two studs touching adjacent foam were mechanically pulled in towards to foam in the stud bay as in below.

No perceptible space between these studs at bottom plate.

Photo 1: No perceptible space between these studs at bottom plate.

4' from the floor, the foam had pulled the stud away from the other two studs.

Photo 2: Same studs as in Photo 1 at 4′ from the floor, the foam had pulled the stud (right) away 1/4″ from the other two studs (left).

This inside corner (below grade stud wall) at 4' height shows  full 3/4" gap foamed after the foam was applied.

This inside corner (below grade stud wall) at 4′ height shows full 3/4″ gap foamed after the foam was applied. A straight edge 2×4 on face confirmed the curvature.

Picture 054

The foam in the above photo pulled away from the studs and even 1/2″ all around. This is not the wood drying its foam not being manufactured (i.e. sprayed) to specification.

So when you find a good foam crew, stick to them!